Showing posts with label MySql Issues. Show all posts

Sunday, November 16, 2014

How to enable mysqli extension WHM Cpanel

For checking if mysqli extension is enabled on not follow the steps below.

SSH server as root user.

========
[root@yourserver ~]# php -m | grep -i mysql
mysql
mysqli
pdo_mysql
========
as you can see above mysqli is enabled.

The mysqli extension allows you to access the functionality provided by MySQL 4.1 and above. More information about the MySQL Database server can be found at http://www.mysql.com/

To enable mysqli extension follow the steps below.

  • Login to WHM.
  • easyapache.
  • Select the package mysql improved from Exhaustive options list.
  • save and rebuild easy apache.

Wednesday, July 30, 2014

Basic mysql command and syntax for database administration

Short tutorial about how to deal with MYSQL databases.

  • Creating Database
mysql> create database dexterserver;
Query OK, 1 row affected (0.00 sec)

dexterserver is the name of the database.

  • Show list of all the databases.
show databases; 

  • Accessing or using a particular database.
mysql> use dexterserver;
Database changed


  • Creating table.
mysql>  CREATE TABLE dexter ( id Int(3), first_name Varchar (15), email Varchar(30), country Varchar(30));

Here table has 4 fields id (numeric field) , first_name (character type field) , last_name (character type field), email (character type field),  country (character type field).


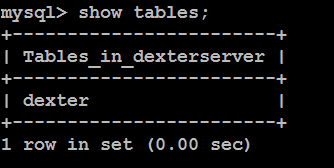
  • Listing all the tables in the database.
show tables;


  • You can view the columns you have created in the tabledexter” as:
show columns from dexter;


  • We will add a column say ‘last_name‘ after column ‘first_name‘.
mysql>  ALTER TABLE dexter ADD last_name varchar (20) AFTER first_name;
Query OK, 0 rows affected (0.27 sec)
Records: 0  Duplicates: 0  Warnings: 0

  • Inserting a row in the table.
mysql> INSERT INTO dexter VALUES ('1' , 'Ronak' , 'Yadav' , 'ronakyadav@domain.com','India' );

  • listing all the entries in a table we use * for all.
select * from dexter;


  • Deleting a row using the id field here id field is numeric.
DELETE FROM dexter WHERE id = 5;


  • deleting a row using the field which has character value, for character we have to use '  '.
mysql> delete from dexter where first_name = 'ronak' ;
Query OK, 1 row affected (0.02 sec)

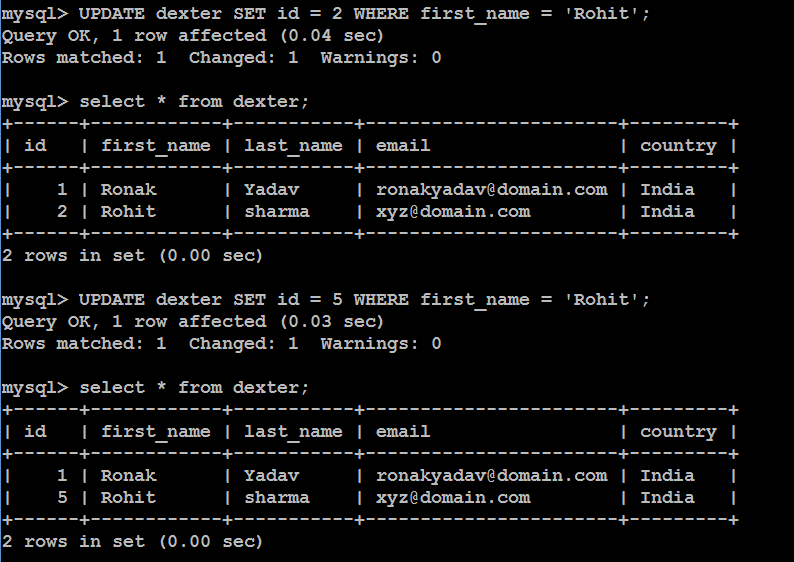
  • Updating a field in the table
UPDATE dexter SET id = 5 WHERE first_name = 'Rohit';


  • Deleting a column from the table.
mysql> alter table dexter drop country;


  • Deleting an existing table.
  • mysql> drop table dexter;
    Query OK, 0 rows affected (0.04 sec)

  • Renaming an existing table.
mysql> rename table dexter TO dexterservers;
Query OK, 0 rows affected (0.03 sec)


  • Creating primary key with auto increment, In auto increment it automatically adds 1 to the last value is nothing is provided.
mysql> CREATE TABLE dexterserver ( id Int(3) NOT NULL AUTO_INCREMENT PRIMARY KEY , name Varchar (15));

For inserting data we have to mention the column name in insert command.

INSERT INTO dexterserver (name) VALUES ('Ronak');

Thursday, May 29, 2014

How to install mysql 5.6.15 in centos and redt hat 64 bit OS

MySQL is open-source relational database management system (RDBMS), The SQL phrase stands for Structured Query Language. The MySQL development project has made its source code available under the terms of the GNU General Public License, as well as under a variety of proprietary agreements, MySQL is a popular choice of database for use in web applications.


 To install MYSQL 5.6.15 on centos 32 bit OS follow the steps below.

If your not sure if your OS is 32 bit or 64 use the link  to check you OS is 32 bit or 64 bit version.

  • yum install wget
  • yum install perl
  • yum install libaio
For installation steps of mysql 5.6.15 on a 32 bit version O.S Click here 

For Installation of mysql 5.6.15 in 64 bit centos follow the steps below 

  • wget http://cdn.mysql.com/Downloads/MySQL-5.6/MySQL-shared-5.6.17-1.linux_glibc2.5.x86_64.rpm
  • wget http://cdn.mysql.com/Downloads/MySQL-5.6/MySQL-client-5.6.17-1.linux_glibc2.5.x86_64.rpm
  • wget http://cdn.mysql.com/Downloads/MySQL-5.6/MySQL-server-5.6.17-1.linux_glibc2.5.x86_64.rpm

If you are facing any issue in downloading rpm packages from above URL you can download from here.

  • rpm -ivh MySQL-shared-5.6.17-1.linux_glibc2.5.x86_64.rpm
  • rpm -ivh MySQL-client-5.6.17-1.linux_glibc2.5.x86_64.rpm
  • rpm -ivh MySQL-server-5.6.17-1.linux_glibc2.5.x86_64.rpm

In MySQL 5.6 root has a default password assigned and its located at /root/.mysql_secret file as mention in MySQL server Installation log, To get the temporary password run the command below.
  • cat /root/.mysql_secret
  • service mysql start
  • chkconfig --levels 235 mysqld on
  • mysql -u root -p
It will ask for password give the password mentioned in mysql_secret file and the set the new password of mysql.
  • SET PASSWORD FOR 'root'@'localhost' = PASSWORD('secret12password');
I have used secret12password as my root password for mysql.

Saturday, May 17, 2014

How to install mysql 5.6.15 in centos and redt hat 32 bit OS

MySQL is open-source relational database management system (RDBMS), The SQL phrase stands for Structured Query Language. The MySQL development project has made its source code available under the terms of the GNU General Public License, as well as under a variety of proprietary agreements, MySQL is a popular choice of database for use in web applications.


 To install MYSQL 5.6.15 on centos 32 bit OS follow the steps below.

If your not sure if your OS is 32 bit or 64 use the link  to check you OS is 32 bit or 64 bit version.

  • yum install wget 
  • yum install perl
  • yum install libaio
For installation steps of mysql 5.6.15 on a 64 bit O.S Click here 

For Installation of 32 bit mysql 5.6.15 in Centos follow the steps below.

  • wget http://dev.mysql.com/get/Downloads/MySQL-5.6/MySQL-client-5.6.17-1.linux_glibc2.5.i386.rpm
  • wget http://dev.mysql.com/get/Downloads/MySQL-5.6/MySQL-server-5.6.17-1.linux_glibc2.5.i386.rpm
  • wget http://dev.mysql.com/get/Downloads/MySQL-5.6/MySQL-shared-5.6.17-1.linux_glibc2.5.i386.rpm

If you are facing any issue in downloading rpm packages from above URL you can download from here.

  • rpm -ivh MySQL-shared-5.6.17-1.linux_glibc2.5.i386.rpm
  • rpm -ivh MySQL-client-5.6.17-1.linux_glibc2.5.i386.rpm
  • rpm -ivh MySQL-server-5.6.17-1.linux_glibc2.5.i386.rpm

In MySQL 5.6 root has a default password assigned and its located at /root/.mysql_secret file as mention in MySQL server Installation log, To get the temporary password run the command below.
  • cat /root/.mysql_secret
  • service mysql start
  • chkconfig --levels 235 mysqld on
  • mysql -u root -p
It will ask for password give the password mentioned in mysql_secret file and the set the new password of mysql.
  • SET PASSWORD FOR 'root'@'localhost' = PASSWORD('secret12password');
I have used secret12password as my root password for mysql.

Tuesday, March 25, 2014

How to Install mysql server in centos

MySQL is open-source relational database management system (RDBMS), The SQL phrase stands for Structured Query Language. The MySQL development project has made its source code available under the terms of the GNU General Public License, as well as under a variety of proprietary agreements, MySQL is a popular choice of database for use in web applications.

 To install MYSQL server on centos follow the steps below.

SSH server

 yum install mysql-server

yum install mysql-devel 

Set the MySQL service to start on boot

chkconfig --levels 235 mysqld on

/etc/init.d/mysqld start
or
service mysqld start

 If this doesent work use below command to find location.

 find / -name mysql

 output will be like we are looking for init.d 

 ==========
/etc/chkserv.d/mysql
/etc/logrotate.d/mysql
/etc/rc.d/init.d/mysql
/home/cpeasyapache/src/php-5.4.20/ext/mysql
/var/run/restartsrv/startup/mysql
===========

 Run the Command.

 /etc/rc.d/init.d/mysql start

T set the MYSQL password run the command below.

   mysqladmin -u root password “New – password”

Mysql should be running before you proceed to change the root password

Thursday, December 05, 2013

How to change mysql root password from backend centos

MySQL is a relational database management system (RDBMS) being light weight it is most commonly used as a database application for websites, To change or set the mysql root password follow the steps below.
  • SSH Server
  • if Setting MySQL root password for the First time ,  use the Following Commands  at terminal.
  • [root@localhost~] #   mysqladmin -u root password “New – password”

Mysql should be running before you proceed to change the root password so check it.
  •  service mysql status
if running proceed to next step else start the mysql service first.
  • service mysql start
  •  Start the MySQL (mysqld) server/daemon process with the –skip-grant-tables option so that it will not prompt for password.
  • mysqld_safe --skip-grant-tables &
  •  Run the command mysql -u root
  • [root@server~] # mysql -u root
 you will get the MySQL monitor then enter the following commands . 
  • mysql > use mysql ;
  •   mysql >update user set password=PASSWORD(“ronak”) where User=’root’ ;
                   Here “ronak” is a new root password 
  •  mysql >  flush privileges ;
  •  mysql >  quit ;

Monday, November 25, 2013

How to Remove MySQL from server completely centos red hat

There maybe a case when you want to completely remove mysql from your server but before un-installing mysql from server make sure you have the backup of databases of mysql the default location of databases is /var/lib/mysql 

To un-install mysql from server follow the steps below.

Step 1: Uninstall Packages

First we need to uninstall mysql packages using following command.


  • yum remove mysql mysql-server

Step 2: Check it there are still packages in the server.
rpm -qa | grep mysql

If you don't get ant thing in the output that means every thing is fine, If you get the output as below proceed with the next step.

========
[root@server ~]# rpm -qa | grep mysql
mysql-5.0.95-5.el5_9
mysql-server-5.0.95-5.el5_9 
========

mysql-5.0.95-5.el5_9 and mysql-server-5.0.95-5.el5_9 are packages which are still installed in the server they maybe different in your case remove them by using the commands below.
  • yum remove mysql-5.0.95-5.el5_9
  • yum remove mysql-server-5.0.95-5.el5_9
Step 3: Rename MySQL Directory

Now we need to just rename existing mysql directory with other name. We can also delete that directory but rename is better to keep a copy of existing files.


  • mv /var/lib/mysql /var/lib/mysql_backup

Thats All

Tuesday, October 22, 2013

mySQL Error 1040: Too Many Connection

If you get a Too many connections error when you try to connect to the mysql server, this means that all available connections are in use by other users.The number of connections permitted is controlled by the max_connections system variable when MySQL is used with the Apache Web server  you should set a larger value for this variable to do so follow the steps below.

SSH server as root user

goto my.cnf

etc/my.cnf

if not able to find the file use the command below.

find / -name | grep my.cnf

vi my.cnf

Find the line increase max_user_connection  and make changes as per your need.

increase max_user_connection=500

increase value 500 is the no of connections allowed currently.

Friday, September 20, 2013

Connect remotely to MySQL databases created on centos Server

Add local ip in whm in remote Additional mysql access hosts
Mysql should be running 

port 3306 should be open

From Server-wide changes login to Back-end

cd /etc/

vi my.cnf
add server ip
#bind-address=IP address(Local IP)   // do not forget make previous ip as comment

bind-address=Server IP where Database is stored

Service mysql restart

From Cpanel

  • When Cpanel using X3 theme, login to Cpanel and click the Remote MySQL , under Databases.
  • Type in the connecting IP address i.e your local IP address, and click the Add Host, Now restart mysql and try to connect.

  • When using X, login Theme to Cpanel and click the MySQL Databases, under Databases.
  • Scroll to the bottom and type in the connecting IP address where it says "Host (% wildcard is allowed):", and click the Add Host, Now restart mysql and try to connect.